Contents
What are we going to build?
In this tutorial you will see how to connect to Facebook, you will be able to:
- Invoke Facebook API
- Add “Login with Facebook” button to your app
- Load data from Facebook
Before you start
Tutorial level: Advanced
Registering a Facebook app
The first step is to create an app in Facebook.
- Go to http://developers.facebook.com/ and log in (or sign up)
- Click on Apps link in the top menu, then Create New App button
- Enter the app name (other fields can be left blank) and click Create
Once the app is created, and you open its settings, it should look like this:
The app ID/API Key and App Secret we will use soon.
Now that the Facebook app is created, let’s go to Tiggzi and create pages for our app.
Creating new project
- In Tiggzi, enter FacebookApp for app name and click Create.
- Create one page, name it connect and just place a single button on it to look like this:
- Create another page, name it result. For now it should be something like this:
The second page (result) is the page to which we are going to be redirected once we log in into Facebook so we need to know its URL (we will need to tell Facebook where to go). Here is how to get the page URL:
- Go to Project > App settings > General and set result to be the Start screen
- Save
- Open Test and uncheck Show in mobile frame
- Click Launch in Web browser button
- Copy the URL (paste it into a notepad or similar as we’ll need it later). The URL will look like this (the id will be different):
http://project.tiggzi.com/view/d8ca9181-48ab-42c4-ba08-15ff1530861f/result.html
- Now that we got the URL, set the Start screen back to connect.
- Save.
We also need to set this callback URL in our app inside Facebook.
- In Facebook, select the app and click Edit App button
- For Website, set the Site URL to the page we display after log in:
http://project.tiggzi.com/view/d8ca9181-48ab-42c4-ba08-15ff1530861f/result.htmlLet’s now work on authenticating against Facebook.
Connecting to Facebook
The steps we are going to complete are from this page: http://developers.facebook.com/docs/authentication/server-side/
Redirect the user to the OAuth dialog
As the first step, we need to redirect to Facebook to log in. We need to add information to the URL so Facebook can identify our app. The format of the URL is this:
https://www.facebook.com/dialog/oauth?client_id=YOUR_APP_ID&redirect_uri=YOUR_REDIRECT_URI&scope=COMMA_SEPARATED_LIST_OF_PERMISSION_NAMES&state=SOME_ARBITRARY_BUT_UNIQUE_STRING
We need to provide the following information:
- YOUR_APP_ID - from app settings page
- YOUR_REDIRECT_URI - URL to which Facebook will redirect after successful log in.
- COMMA_SEPARATED_LIST_OF_PERMISSION_NAMES - what resources your app can access. A complete list is here.
- SOME_ARBITRARY_BUT_UNIQUE_STRING - a random number
For scope, let’s use the following permissions:
- user_education_history
- friends_education_history
- user_work_history
- friends_work_history
Add a Click event to the button, then Run Custom JavaScript action and the following code (note that you have to set the <your_app_id> in the URL):
var redirectUrl = 'http://project.tiggzi.com/view/d8ca9181-48ab-42c4-ba08-15ff1530861f/result.html';
var url = 'https://www.facebook.com/dialog/oauth?client_id=<your_app_id>';
url += '&redirect_uri=' + redirectUrl;
url += '&scope=user_education_history,friends_education_history,user_work_history,friends_work_history';
url += '&state='+OAuth.nonce(17);
var cb = null;
if(window.plugins) {
   cb = window.plugins.childBrowser;
}
if (cb != null) {
/* Wen native childBrowser plugin must be used to navigate to facebook. */
   cb.onLocationChange = function (url) {
   if(url.indexOf(redirectUrl) === 0) {
      /* if user successfully logged in */
      cb.close();
      var vars = parseUrlVars(url);
      localStorage.setItem('code', vars.code + '_'); /* store secret code */
      Tiggzi.navigateTo('result', {reverse: false}); /* Navigate to page 'result' */
   }
};
   cb.showWebPage(url);
}
else {
   localStorage.setItem('code', '');
   window.open(url);
};
Also create new JavaScript named “Facebook_utils” and paste next function there:
/** Parse string in "key1=value1&key2=value2" into object:
 {'key1':'value1',
 'key2':'value2'}.
 **/
function parseUrlVars(url) {
   var vars = [];
   var params = url.slice(url.indexOf('?'));
   if(params.indexOf('#')>=0) {
      /*Remove all symbols after '#'*/
      params = params.slice(0, params.indexOf('#'));
    }
    params = params.slice(1).split('&');
    for (var i in params) {
       var item = params[i].split('=');
       vars.push(item[0]);
       vars[item[0]] = item[1];
    }
    return vars;
}
When test the app and click on this button, you should see the following screen:
Once you successfully log in, you will be redirected to the second page in your app.
The user is redirected back to your app
Based on Facebook documentation, you will be redirected to this URL:
YOUR_REDIRECT_URI?state=YOUR_STATE_VALUE&code=CODE_GENERATED_BY_FACEBOOK#_=_
Using our example, the URL will look like this:
http://project.tiggzi.com/view/d8ca9181-48ab-42c4-ba08-15ff1530861f/result.html?state=YOUR_STATE_VALUE&code=CODE_GENERATED_BY_FACEBOOK#_=_Note that #_=_ will be added automatically by Facebook. However, # in the URL also causes jQuery Mobile not to work correctly (blank screen when callback page is loaded). To make sure jQuery Mobile works, we need to clear the hash (#) like this:
You might see Uncaught TypeError: Cannot call method ‘trigger’ of undefined error in the console, you can ignore it.
|
Now what we need to do is read the code value returned by Facebook.
If your application runs on mobile device then redirect URL is already processed on the first screen and local storage variable code is already created.
Otherwise page URL of Result screen must be processed.
- Go to Design view of Result page, click Events button (on the bottom of the screen)
- From Component dropdown select Result page, add Load Event and Run Custom JS action
- Enter the following code:
var code = localStorage.getItem('code');
if( code==undefined || code=='' ) {
   /* Read Facebook generated code from page URL */
   var vars = parseUrlVars(window.top.location.href);
   console.log('Facebook code: ' + vars.code);
   localStorage.setItem('code', vars.code + '_');
}
Above code will read the code parameter and save it in local storage.
Exchange the code for a user access token
Next we need to make another request to Facebook, include the just received code and we will get back a token. This token is what we need to invoke Facebook API. To send the request to Facebook, we will create a new service.
- Create a new service, call it GetToken
- REST service properties:
- URL: https://graph.facebook.com/oauth/access_token
- Keep everything else default
- Open Request Parameters panel, create the following parameters and set them to default values (if specified)
- client_id - set to App ID/API Key from app settings page
- redirect_uri - set to the redirect URL from step 1 above
- client_secret - set to App Secret from app settings page
- code - leave this blank, we’ll set it when we map the service to the page
The result should look like this (your values will be different):
As we are not getting back a JSON response, we are not going to define the response. Instead, we will read the response directly and retrieve the token.
Adding service instance to the page
- Open Result page, go to Data tab, from dropdown select Service then select GetToken, click Add button
- Enter get_token for datasource name. The result will look like this:
- Click Edit Mapping button.
- On the service input side, everything is set except the code value. If you remember, we saved the code into local storage. On the right-hand side, in the input field enter
codeand then click Create new > Local storage variable.
Note: the actual local storage already exists (we created it in step #3), we are simply adding it to the builder. - Now, select the “code” on the right-hand side and connect it to the code on the service side.
- We get the following data from Facebook:
access_token=USER_ACESS_TOKEN&expires=NUMBER_OF_SECONDS_UNTIL_TOKEN_EXPIRESWe will save the access_token value so we can use it later.
- Click Events button (on the bottom of the screen)
- From Component dropdown select get_token
- Add Event > Complete, then add Action > Run Custom JavaScript. Enter the following:
var vars = jqXHR.responseText.split("&");
var access_token = vars[0].split("=")[1];
localStorage.setItem('access_token', access_token);
The above code will get the access_token value and save it in local storage.
- The last step is to invoke the service when we are redirected to this page or on page load. Go to Design view of Result page, click Events button (on the bottom of the screen)
- From Component dropdown select Result page, add Event Load and Invoke Service action, select get_token service.
There should be two actions defined on page load:
- To read the code value
- To make an immediate request to Facebook (with the code) to get the access token.
Now that you got the access token, you can make requests to Facebook API.
Make requests to the Graph API
To test that we can make requests to Facebook’s Graph API, we can use the following REST service to get information about the logged in user:
https://graph.facebook.com/me?access_token=YOUR_USER_ACCESS_TOKENLet’s create the service first
- Create a new service, name it GetData
- REST service properties
- URL: https://graph.facebook.com/me
- Request Parameters
- access_token
- Response Parameters
- Response parameters are a little bit tricky as JSON structure depends on what data you requested in permissions (step #1), but there is workaround we can use but first we need to run the service, even without displaying the result in the app.
- Add service instance to the Result page (open Result page, go to Data tab, from dropdown select Service then select GetData, click Add button)
- Rename service instance to get_data
- Lastly, add Click event then Invoke Service action to the Get Data button.
- Click Edit Mapping button
- Create access_token local storage variable on the page side
- Map the local storage variable to access_token on the service side:
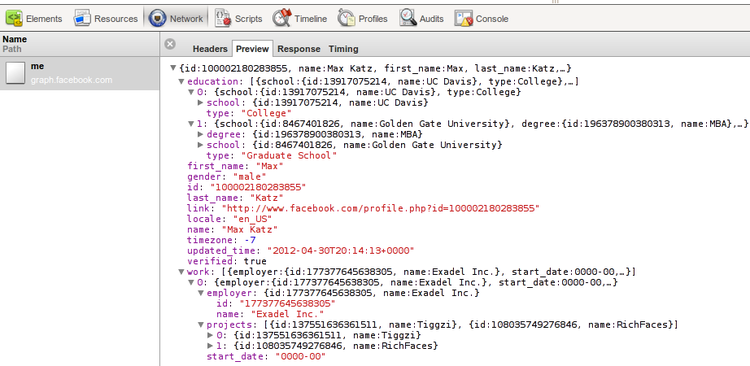
- Launch the app in the browser, and open Chrome Developer Tools Network to see the actual request/response.
- Click the Get Data button to invoke the service. If everything worked fine, you should see something like this:
- Switch to Response tab, from there you can copy the entire response.
- Go back to the service and open Response Parameters panel.
- Click Automatically Create from Sample Response button and paste the JSON result.
- Click Automatically Create from Sample Response button
- Click Close
Now we got the correct response structure defined. You should be able to display the result on the page as with any other service after completing the mapping.
As an example, I created the following UI:
the mapping look like this:
Running the app:
Note that you can also invoke the GetData service on page load, instead of clicking the button. The Result page will have three actions:
- Run Custom JavaScript (get code value returned by Facebook)
- Invoke Service (get acces_token)
- Invoke Service (invoke Facebook API)
Using Facebook API
Once you have the access token, you can call any Facebook Graph API. Facebook (for obvious reasons) provides very powerful and extensive API.