Contents
- 1 What are we going to build?
- 2 Before you start
- 3 Microsoft guide for designing app UI
- 4 Creating a new Windows 8 project
- 5 Creating the UI
- 6 Creating Services
- 7 Mapping the Service to the UI
- 8 Invoking the Service
- 9 Testing the App
- 10 Adding and Setting Up a Search Contract
- 11 Adding and Setting up Live Tiles
- 12 Snap View
- 13 Adding and Setting Up a Share Contract
- 14 Publishing Your App to the Windows Store
What are we going to build?
This tutorial is going to show you how to build a Windows 8 app to search Twitter. The Twitter Search REST API will be used to find all tweets using a term entered in the app. The resulting app will be a native Windows 8 app, including support for the new “Modern UI” (aka Metro Style), with a Live Tile, support for Snap View, and the Windows 8 Search and Share charms. Before proceeding, keep this in mind:
- You need to use Firefox to build and test the app in the browser. (IE10 support is coming soon.)
Before you start
Tutorial level: Beginner, your first mobile app
Prerequisites: Tiggzi account
Microsoft guide for designing app UI
Microsoft provides an extensive guide on building UI for apps. Please read this guide now or after you are done with this tutorial.
Creating a new Windows 8 project
To create a new Windows 8 project, follow the steps below:
- Sign in to Tiggzi and click on APPS in the upper-right-hand corner of the screen.
- Click on the More create options link to the right of the Create button.
- In the new screen, enter an app name, for example, TwitterWindows8.
- Select the Windows 8 App radio button. (Windows 8 app support is only available in the new builder)

- Click Create to open the new project in the new builder. It should display a welcome screen as shown below:

Creating the UI
The UI is created by dragging and dropping components from a left-hand palette and setting component properties from a right-hand panel.
- On the left-hand panel, expand Pages and select Home. You will see the following screen:

- Click on the black screen.
- In the right-hand Properties panel under Custom, find the Rows field and make the entry “120px;auto;1fr”. A new row will be displayed.
- The “auto” parameter sets the size automatically by the content. If the cell is empty, it’s not displayed.
- The “fr” parameter (fractional width) is necessary for dividing the remaining space into frames in proportion to the number used with “fr”. For example, take “100px;1fr;2fr“. If the overall width of the element were 1000 pixels, it would be divided into 3 frames of 100 pixels, 300 pixels, and 600 pixels, respectively.
- From the Design components palette on the left, select an Input component under Controls and drop it inside the first row/second column cell. For the input component, change the name to query_input.
 You will see the following screen:
- Click on the parent container (aka the first row/second column cell) of the new input.
- Under Custom properties, set Column align to “start”. This input field will be used to enter the Twitter search string.

- Now select a Button component and drop it inside the cell to the second row/second column. For the button component, change the name to search_button.
- Select the new button’s parent container as you did for the new input and set Column align to “start”.

- Select the button and change its label to Search by entering the name into the Text field under Common properties.
- To test the app, click the Test button in the upper-right corner of the browser screen.

- Next we are going to add a Listview component where the app will display the search results. To add the Listview component, select the component from the Containers section and then drop it inside the cell in the third row/second column. For the listview component, change the name to tweets_list.
- Select the component and change the Height to “160px” under Common properties. Select a Grid component from the Layouts components and drop it inside the listview.

- With the grid selected, set the Rows field under Custom properties to “auto;auto;auto;auto” and Columns to “1fr;1fr”. Set its size by entering the following values to the fields under Common properties: Width: “600px”, Height: “160px”. NOTE: If you select auto parameters, the size will change depending on the contents.
- Select an Image component from the Controls components and drop it in the first row/first column of the grid you have created. This is where the picture of each tweet will be displayed.
- Set image size to 48px by 48px.
- Select the image component’s parent and set its Column align to “start”.
- Select a Label component from the Controls section and drop it in the second row/first column of the grid. This is where the name of the tweet’s author will be displayed. For the label component, change the name to from_user_name.
- Select the label’s parent and set its Column align to “start”.
- Reselect the label and set the Text field under Common properties to be blank.
- Select another Label component from the Controls components and drop it to the third row/first column of the grid. For the label component, change the name to text. Apply the same steps for the label as you have done above (column align = start, and text field = blank).

- Add a Label component to the fourth row/first column and change the name to created_at.
- Select an Image component and add it to the first row/first column. Change its name to profile_image. For the parent element, select Row span=2. NOTE: Saving is not required until the end. However, you can save the project at the end of each section by clicking on the Save button in the top menu bar of the editor.

Creating Services
Now you need a Tiggzi service component that can be used in building the Twitter Search REST service. To define some things about the service and specify the request and response parameters, follow the steps below:
- In the upper-left part of the screen, click on Create New and then click on Service from the drop-down menu.
- Enter the name TwitterSearch and click on the Create Service button. The new service will be listed under Services on the left .
- Click on the TwitterSearch label to open the service editor.
- In REST Service Properties section, enter http://search.twitter.com/search.json for the URL and select jsonp as the Data Type.

- Open the Request section leftward this section. Enter q into the text input box and click Add.

Automatically Create Service Response
Once you have everything else defined in the service, you need to store what the response parameters will be for the request. The easiest way to figure out this response structure is to just let Tiggzi do it for you. Follow these steps:
- Open the Test tab.
- Enter the test value for your query parameter.
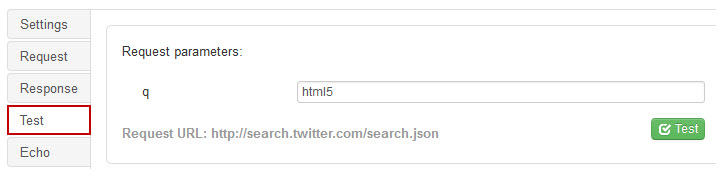
- Click on the Test button.

- If you get the Test successful message, you need only click on the Automatically Create Service Response button.
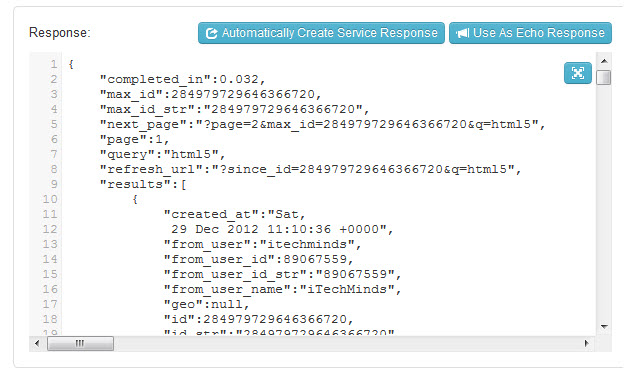
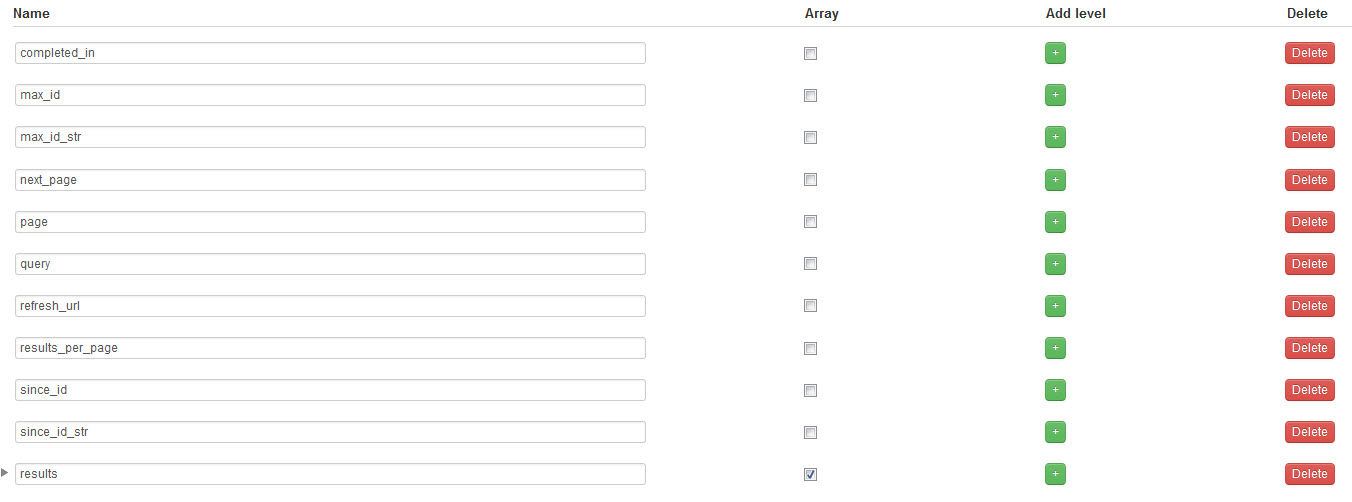
- After you have clicked on the Automatically Create Service Response button, open the Response tab to populate the response structure.
Mapping the Service to the UI
Once the REST service parameters and the UI components have been created, you will now need to connect them together in the Data section of the editor.
- Select the home tab above the service editor and click on the Data side-tab.
- From the Type drop-down menu, select Service.
- From the Component drop-down menu, select TwitterSearchService.
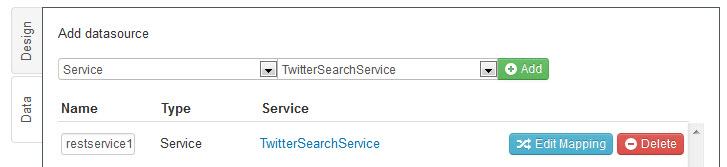
- Click on the green button to the right.
- Now click the Edit Mapping button and a new screen with the mapping editor will be displayed. NOTE: The Request tab is selected by default. It’s marked white, which means you are working with it
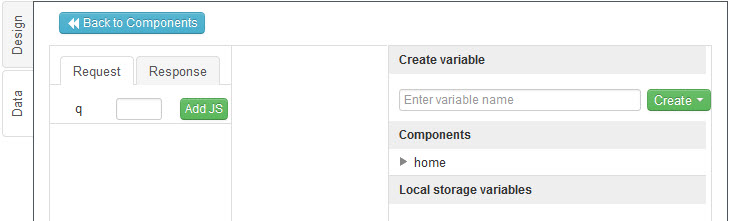
- On the right-hand side under Components, expand home element and then expand the first sub-item under it.
- Click on the q parameter on the left-hand side, drag the cursor to the Text label under the expanded sub-item, and drop.
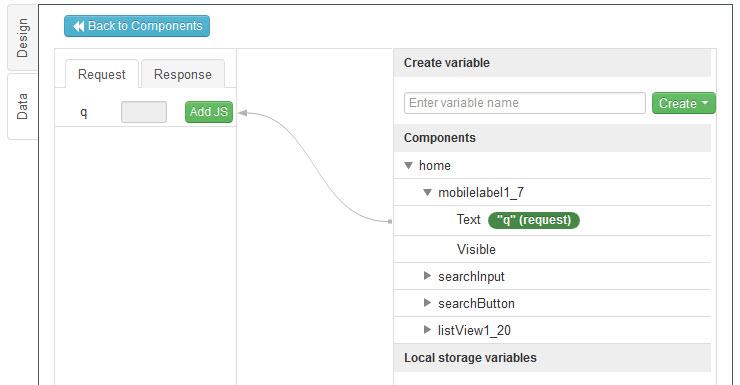 The input component is now mapped to the REST service input.
 - Click on the Response tab. Expand results on the left-hand side, collapse the input component on the right-hand side, and expand the listview component and it’s sub-items until everything is exposed.
- Using the same drag-and-drop approach as above, define the following mappings:
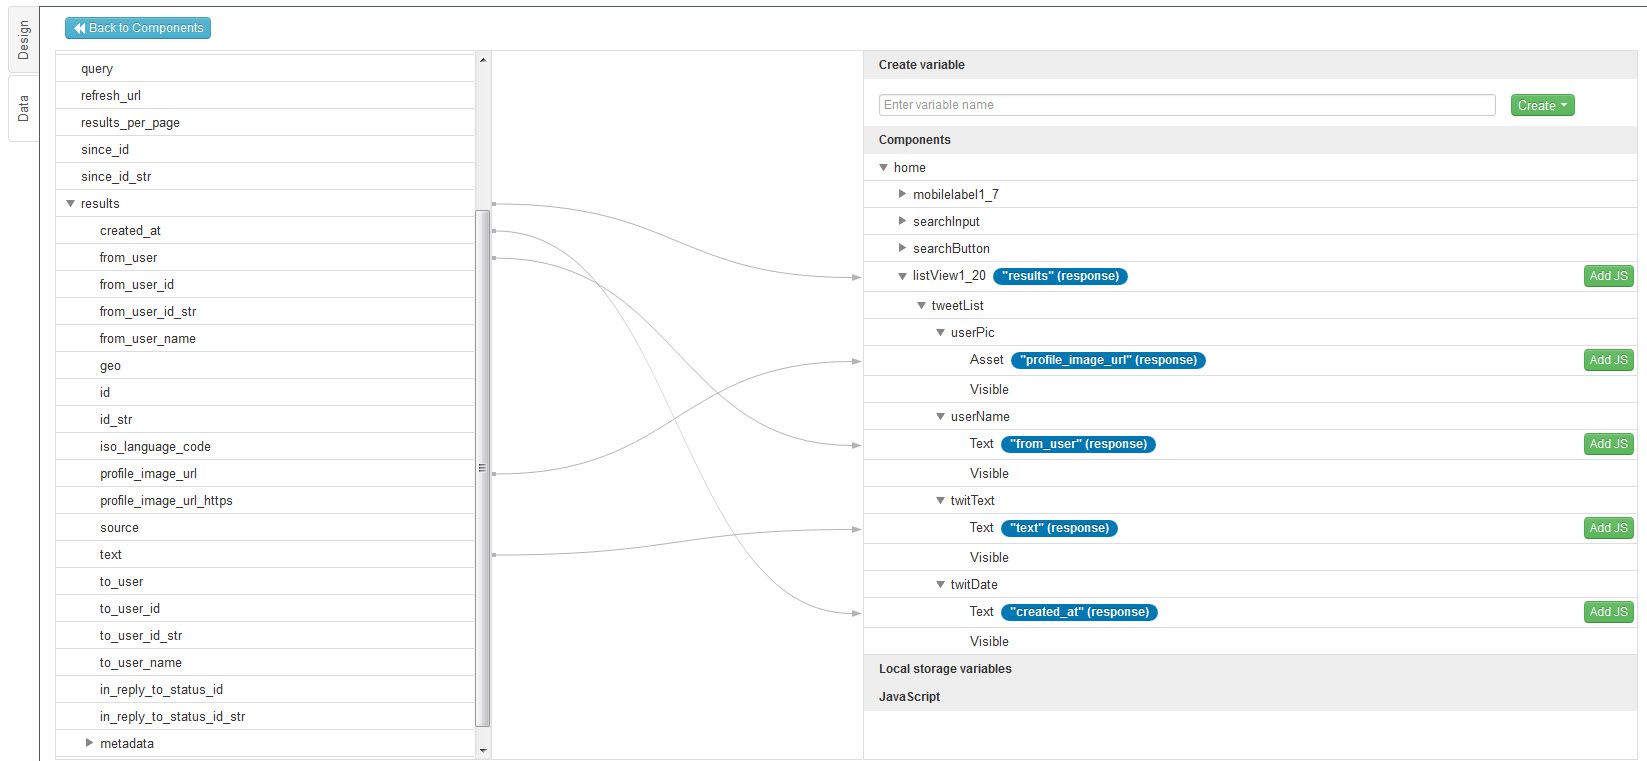
The results parameter is the collection of all tweets found through the query. You are mapping it to the parent listview container to get automatic looping. The rest of the mappings are straightforward.
Invoking the Service
You now have the UI, the service component for using the REST service from the app, and the data mapping connecting the UI and the service together. The only thing left is to trigger an event for the data mapping to invoke the service.
- Switch to Design side-tab and click on the Search button to select it. Find the Events tab in the bottom of your screen:
- Click on this tab to open the events panel.
- From the Component drop-down menu, select the searchButton component.
- From the Event drop-down menu, select Click.
- From the Action drop-down menu, select Invoke datasource.
- From the Service drop-down menu, select restservice (the service data mapping you created).
- Click on the green button to add this event.
The service can now be invoked by clicking on the Search button in the app.
Testing the App
To test your application, click on the Test button in the upper-right corner of the screen and enter any term to search for. You will see the following screen with similar results: 
You have now completed the main application. Next, you are going to add some Windows 8 features so your app looks and feels native. Because those features are native Windows 8 capabilities, you will not be able to test them inside the browser.
Adding and Setting Up a Search Contract
To add and set up a Search Contract:
- Open Projects > Create New and select Extensions from the drop-down list.

- Select Create Extension.

- Click Search Extensions and set the properties in the opened window.
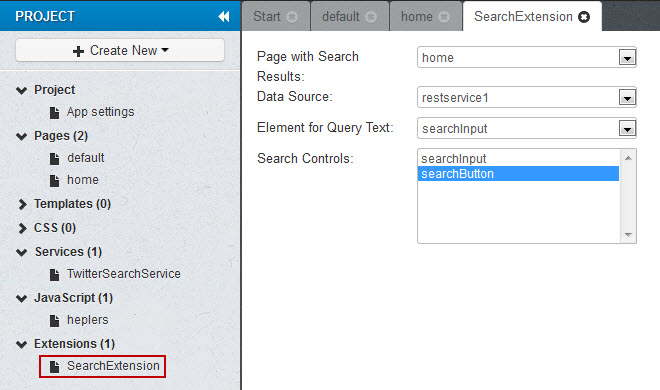
- Page with Search Results is the page for displaying search results.
- Data Source defines the source for searching.
- Element for Query Text defines the element for returning the retrieval request.
- Search Controls are elements for search direction.
Adding and Setting up Live Tiles
To add and set up Live Tiles:
- Select Data tab and click on Events button to display the panel for defining other extensions. NOTE: The code that appears on the window is the description of the tile.

- In the opened window, set the following properties for Live Tiles:
- Component (the data source to be displayed)
- Event (by default, the event is set to Success)
- Action (by default, the action is set to Update live tile)
- Editor defines the following properties for displaying tiles:
- * Tile template (one of tile templates)
- * Period (changeover time for tiles, counted in seconds)
- * Get tile content (the field for changing predefined tile values)
- Click on the green + button. It’s ready.

Snap View
Snap View allows placing the elements on the page in your own manner. In order to change your view, follow the steps below:
- Create your application in the editor.
- Select one of the view buttons on the right from Help.
- Reorganize and resize the elements according to your needs.
To add and set up Share Contract, follow the steps below:
- In the editor window, click on the Events button to display the event panel.
- For home component, select Data requested event and Share contract (source) action.
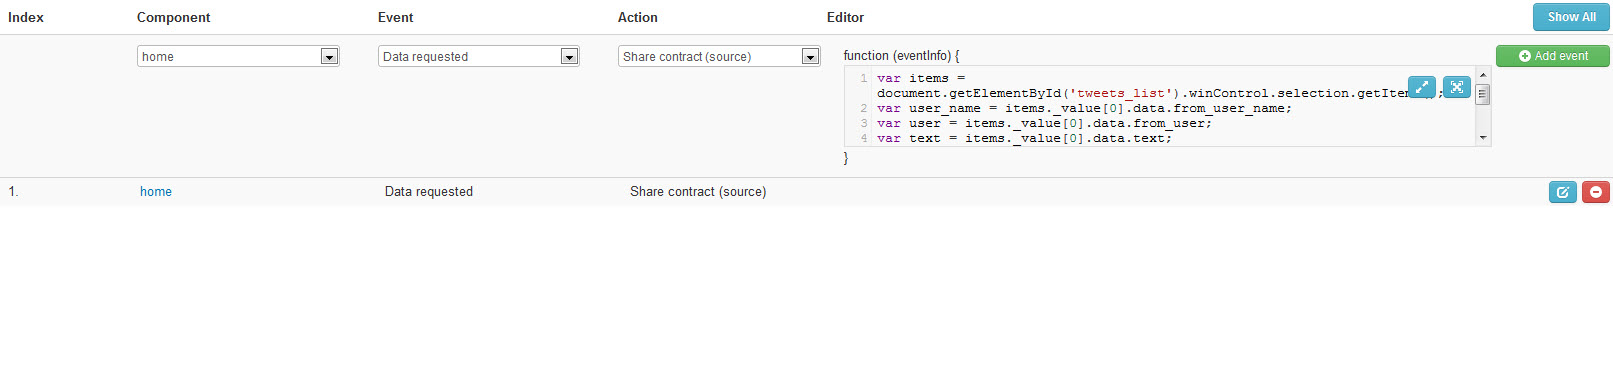
- Insert your JavaScript in the function field. For example, use the following code to send a link to the message:
var items = document.getElementById('tweets_list').winControl.selection.getItems();
var user_name = items._value[0].data.from_user_name;
var user = items._value[0].data.from_user;
var text = items._value[0].data.text;
request.data.properties.title = "Tweet from: " + user_name;
request.data.properties.description = text; request.data.setUri(new Windows.Foundation.Uri("http://twitter.com/" + user)); request.data.setText(text);
NOTE: You will need to write the code yourself for each required purpose.
- Click on the green + button.
After the app has been created, you can export it to Visual Studio by clicking on Export > Visual Studio Sources, where it can be changed and improved according to your needs. After all the necessary changes, you can get your app into the Windows Store.
Publishing Your App to the Windows Store
Building a store-ready Windows 8 app with the Tiggzi platform is easy. Follow the steps below:
- Download Windows 8. NOTE: You can download a 90 day FREE evaluation version of Windows 8.
- Download Visual Studio Express 2012 for Windows and install it in Windows 8. You’ll find additional design assets, app samples, and other tool downloads going by the link. NOTE: Visual Studio Express for 2012 is a free download. If you’re an MSDN subscriber, you can get Windows 8 and Visual Studios from MSDN Subscriber Downloads.
- Sign up for your Windows Store Account and reserve your app name.
- If you are an MSDN subscriber, get a free one-time, 12-month Windows Store account.
- If you are a student, the subscription fee is waived.
- If you are a startup or small business, get a free one-time, 12-month Windows Store account
- Check out the Microsoft Windows 8 Developers Guide information and expert recommendations how to create and monetize Windows 8 apps leveraging their key features such as Live Tiles and Share as well as how to setup selling and advertising features.
- Sign up for a Tiggzi account, if you don’t have one already.
- Review Windows 8 app certification requirements. Download the Windows App Certification Kit. The tool can help your app pass Windows Store certification including testing your app.
- Build your app and upload it to the Windows Store. The link will help make the submission as easy as possible.
A few things to keep in mind:
- If you have any certification errors, go by the link to resolve them.
- Create links from your website and other marketing vehicles to your apps in the Windows Store.